Simple (And Cheap) Plastic Tote Greenhouse For Seed Starting
A plastic tote greenhouse is the easiest way to extend the growing season. Learn how to turn an old tote into a mini greenhouse that's perfect for small spaces.
A plastic tote greenhouse is truly the easiest and cheapest way I've found to start seeds early in the season. As someone who hates to waste money and space on single-use gadgets (I'm looking at you, grow lights!) this super simple DIY project is the perfect solution for seed starting.
It's ideal for gardeners who are short on space–and cash–but want to get a head start on their garden. All it takes is a few easy steps to turn a plastic tote into a mini greenhouse that fits even the smallest garden space and budget.
How a Plastic Tote Greenhouse Works
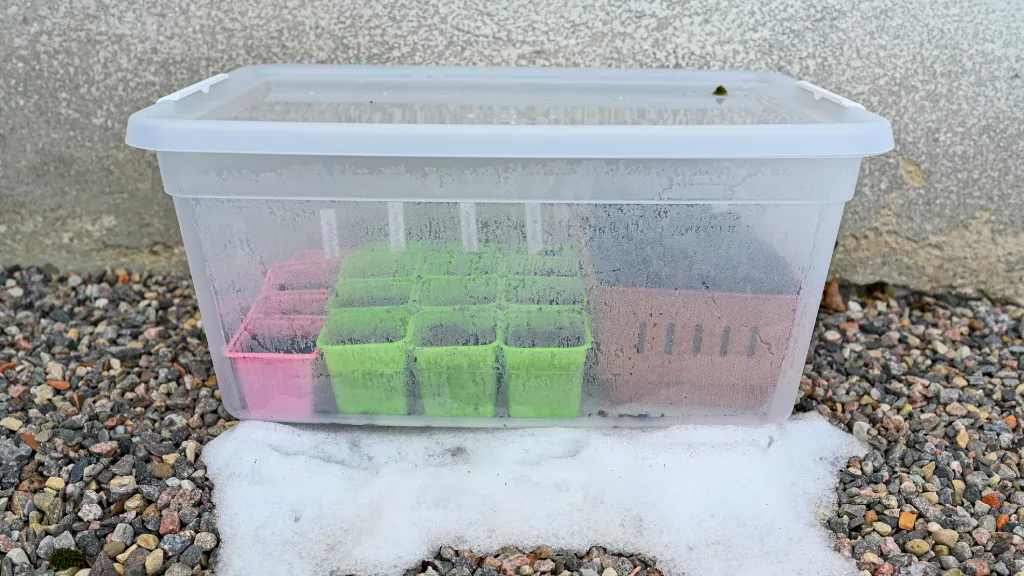
A plastic tote greenhouse is essentially a cold frame. You can use it to start seeds early or protect tender seedlings. I use one to start seeds for my summer vegetable garden. It’s a huge help in Northern Michigan where the growing season is short. Even when outdoor temperatures are in the 40s F (4-10 C), plants are safe and warm inside their cozy tote.
What You Will Need
All you need for a plastic tote greenhouse is a clear plastic storage container with a lid. You may already have one lying around your house. If so, this project becomes even easier (and cheaper). If not, you can find a plastic tote at most dollar stores and superstores for only a few dollars.
Make sure the tote is transparent and not colored. Seedlings need lots of sunlight to get a strong start. The lid for your storage container greenhouse can be clear, colored, or opaque.
Your clear tote greenhouse can be as big or as small as you want, depending on how many plants you plan to grow. However, make sure your tote is large enough to fit your seedlings as they grow bigger. For my greenhouse, I use a 24 x 16 x 13.5 in. (61 x 41 x 34 cm.) tote. That size easily holds 20-30 seedlings in 3 inch (7.6 cm.) diameter pots. If you use seed starting trays, you can accommodate even more plants.
How to Make a Plastic Tote Greenhouse
There are two ways to make a DIY plastic tub greenhouse, depending on what kind of lid your container has:
Sign up for the Gardening Know How newsletter today and receive a free copy of our e-book "How to Grow Delicious Tomatoes".
1. If your container has a clear lid, all you need to do is place your seedlings inside the plastic tote and put on the lid. During the day, when temperatures reach 45 degrees F (7 C), crack the lid to ventilate. Push aside the lid to allow air flow and prevent overheating. You can also prop open the lid with a short wooden board or stick, but be careful the wind doesn’t blow it away.
2. If your container has an opaque or colored lid, flip over the tote and make the lid the base of your plastic container greenhouse. Place your seedlings on the inverted lid and set the tote over top. During the day, lift the tote and prop it open with a brick or block of wood, anything that will allow air to flow inside the greenhouse and prevent plants from getting too hot.
Tips for Using Plastic Containers as Mini Greenhouses
While plastic tote greenhouses are simple to make and use, keep these considerations in mind for the best results:
Provide Good Air Flow
Good air flow is key to growing in any kind of greenhouse environment, from large commercial operations to small DIY plastic tub greenhouses. Mold can set in quickly, so check your plants daily for signs of disease. If you do notice mold, remove the affected plants and open your clear plastic tote greenhouse to increase air flow and reduce excessive moisture. Cut back on watering if seedlings are excessively wet.
Monitor Temperatures
Temperature is another important factor in greenhouse gardening. Depending on the sun and outside temperature, your mini greenhouse can get quite warm. Most vegetables don't like temperatures over 90 F (32 C) and seedlings are more tender than full-grown plants. Place a thermometer inside your plastic tote greenhouse to monitor temperatures.
Plants can burn if it gets too hot inside the greenhouse. I speak from personal experience. One sunny spring morning, I waited too late to open my greenhouse. It was about 70 F (21 C) when I finally checked on my plants and as I lifted the lid, smoke poured out. My plants were fried. The crispy, burnt tomato seedlings smelled like cigarettes. It was an unfortunate way to learn that tomatoes and tobacco are both part of the nightshade plant family. I was able to recover most of my plants, but that morning taught me how important it is to check your greenhouse early in the day.
Choose the Right Location
One of the benefits of a plastic container greenhouse is its portability. Ideally, you should place your greenhouse in a sheltered location with southern or southeastern exposure. But not every garden is blessed with that oh-so-coveted southern sun. Thankfully, it’s easy to move your mini greenhouse to follow the sun throughout the day. When temperatures dip below freezing at night, you can move the whole tote indoors to protect plants from cold damage.
If possible, keep your plastic tote greenhouse in a sheltered spot to protect it from wind that could blow away the lid or the whole tote. You can also place a brick or small weight on top of your greenhouse to combat this problem.

Laura Walters is a Content Editor who joined Gardening Know How in 2021. With a BFA in Electronic Media from the University of Cincinnati, a certificate in Writing for Television from UCLA, and a background in documentary filmmaking and local news, Laura loves providing gardeners with all the know how they need to succeed, in an easy and entertaining format. Laura lives in Southwest Ohio, where she's been gardening for ten years, and she spends her summers on a lake in Northern Michigan. It’s hard to leave her perennial garden at home, but she has a rustic (aka overcrowded) vegetable patch on a piece of land up north. She never thought when she was growing vegetables in her college dorm room, that one day she would get paid to read and write about her favorite hobby.