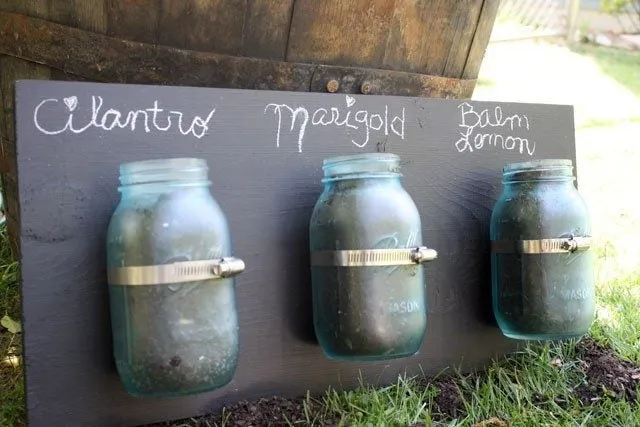
A simple, quick, and fun project that will add not only a decorative touch but doubles as a useful culinary staple is a Mason jar herb garden. Most herbs are extremely easy to grow and growing them in a jar is a straightforward endeavor as long as you provide plenty of light and proper drainage. A couple of herb garden Mason jars tucked into a bookshelf or resting on a sunny windowsill add a splash of outdoor color to the kitchen. Plus, the added benefit is you can easily snip off a sprig from your jar of herbs for your latest culinary masterpiece. Suitable plants for herb jars include:
How to Grow Herbs in a Mason Jar
The first step to creating a Mason jar herb garden is obtaining the jars. Used for canning foods since 1858, Mason jars are still available today. However, searching for them at flea markets, thrift stores, or Grandma's basement or attic is a fun, inexpensive way of getting your jars and you can pat yourself on the back for recycling and repurposing! You may even use recycled pasta or pickle jars with the labels soaked and the jars thoroughly washed. Starting your jar of herbs from seeds in the Mason jar is not a recommended course of action. Using transplants is a surer recipe for success when planting herbs in canning jars, such as the plants for herb jars listed above. Herbs have roots that are a little larger than their top growth so be sure to use a jar that allows for the root growth. It is helpful to select drought-friendly herbs in case of missed watering, and trailing herbs like some thyme look lovely in the glass jar. Adequate drainage is essential for your herbs in canning jars, so the next step is to drill a few holes in the Mason jar. This step can be dangerous, so be sure to wear safety glasses and gloves. Use a diamond cutting drill bit and cover the jar with cutting oil. Use even pressure and drill slowly to prevent breakage. Make several 1/8 to ¼ inch (0.25 to 0.5 cm.) holes in the Mason jar. Fill the bottom of the jar with broken pottery shards, colored stones, or the like to improve drainage and add visual interest to your Mason jar herb garden. Conversely, if you do not have a drill or are timid about using it on glass, you may simply fill the bottom with an inch (2.5 cm.) or so of stones, marbles, pottery bit, etc. to keep the roots from becoming too wet and rotting. Fill the jar with a bagged potting mix or your own mix of equal part sphagnum peat, compost, and sand to about 1 inch (2.5 cm.) below the jar's edge. Fertilizer can be added to the soil medium at this point or use a soluble fertilizer after planting. Plant the transplanted herbs so the root ball is level or slightly below the surface of the potting media. Moisten the potting media first with a bit of warm water, then add the mix, covering the tallest transplant root ball so it sits with its top surface ¾ inch (2 cm.) below the rim of the jar. Water the Mason jar herb garden thoroughly. Allow any excess water to drain in the sink or in a shallow tray and then place the herbs in canning jars in a sunny area where they get at least six hours of sun per day. Keep the jar of herbs moist but not sodden. As the plants outgrow the jars, replace them with new transplants and move the bigger herbs into larger pots.
Sign up for the Gardening Know How newsletter today and receive a free copy of our e-book "How to Grow Delicious Tomatoes".

Amy Grant has been gardening for 30 years and writing for 15. A professional chef and caterer, Amy's area of expertise is culinary gardening.